Information
In this video tutorial you'll get to see the process of creating an interactive interior scene created using Blender and Verge 3D
Stuff mentioned in the video:
- Get Verge3D (affiliate Link)
- Download the project files
- Free PBR Textures by cgbookcase.com
- Free PBR Textures by CC0 Textures
- Free HDRIs by HDRI Haven
Text Summary
- Modeling
- Lighting and Baking
- Setting up a Verge3D Project
- Creating the Materials
- Making it Interactive
- User Interface & Making it interactive II
Modeling
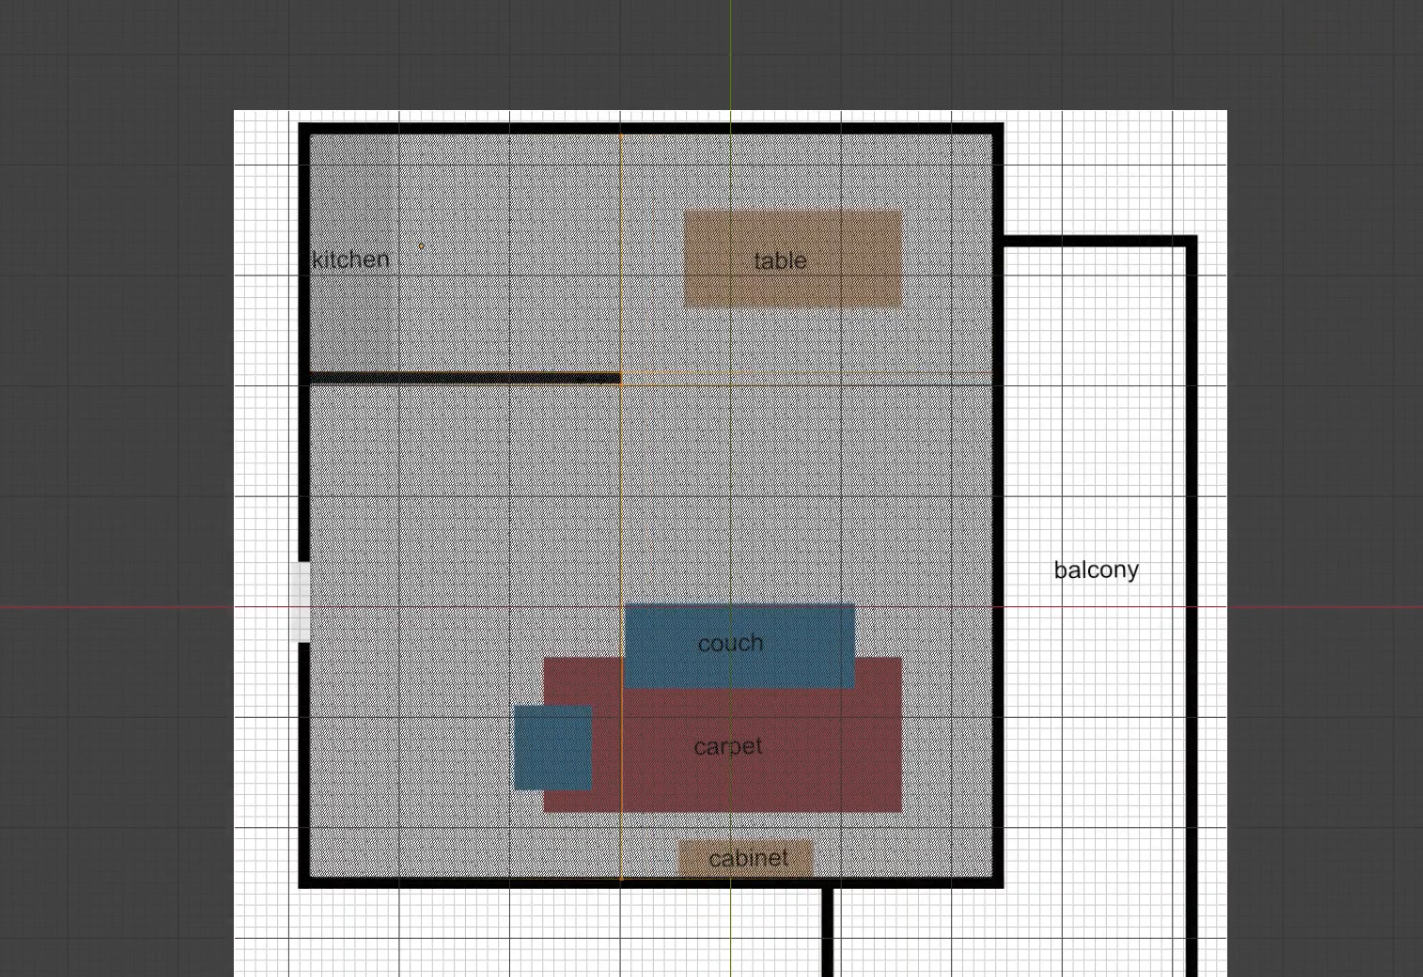
Floor, wall, ceiling, baseboard
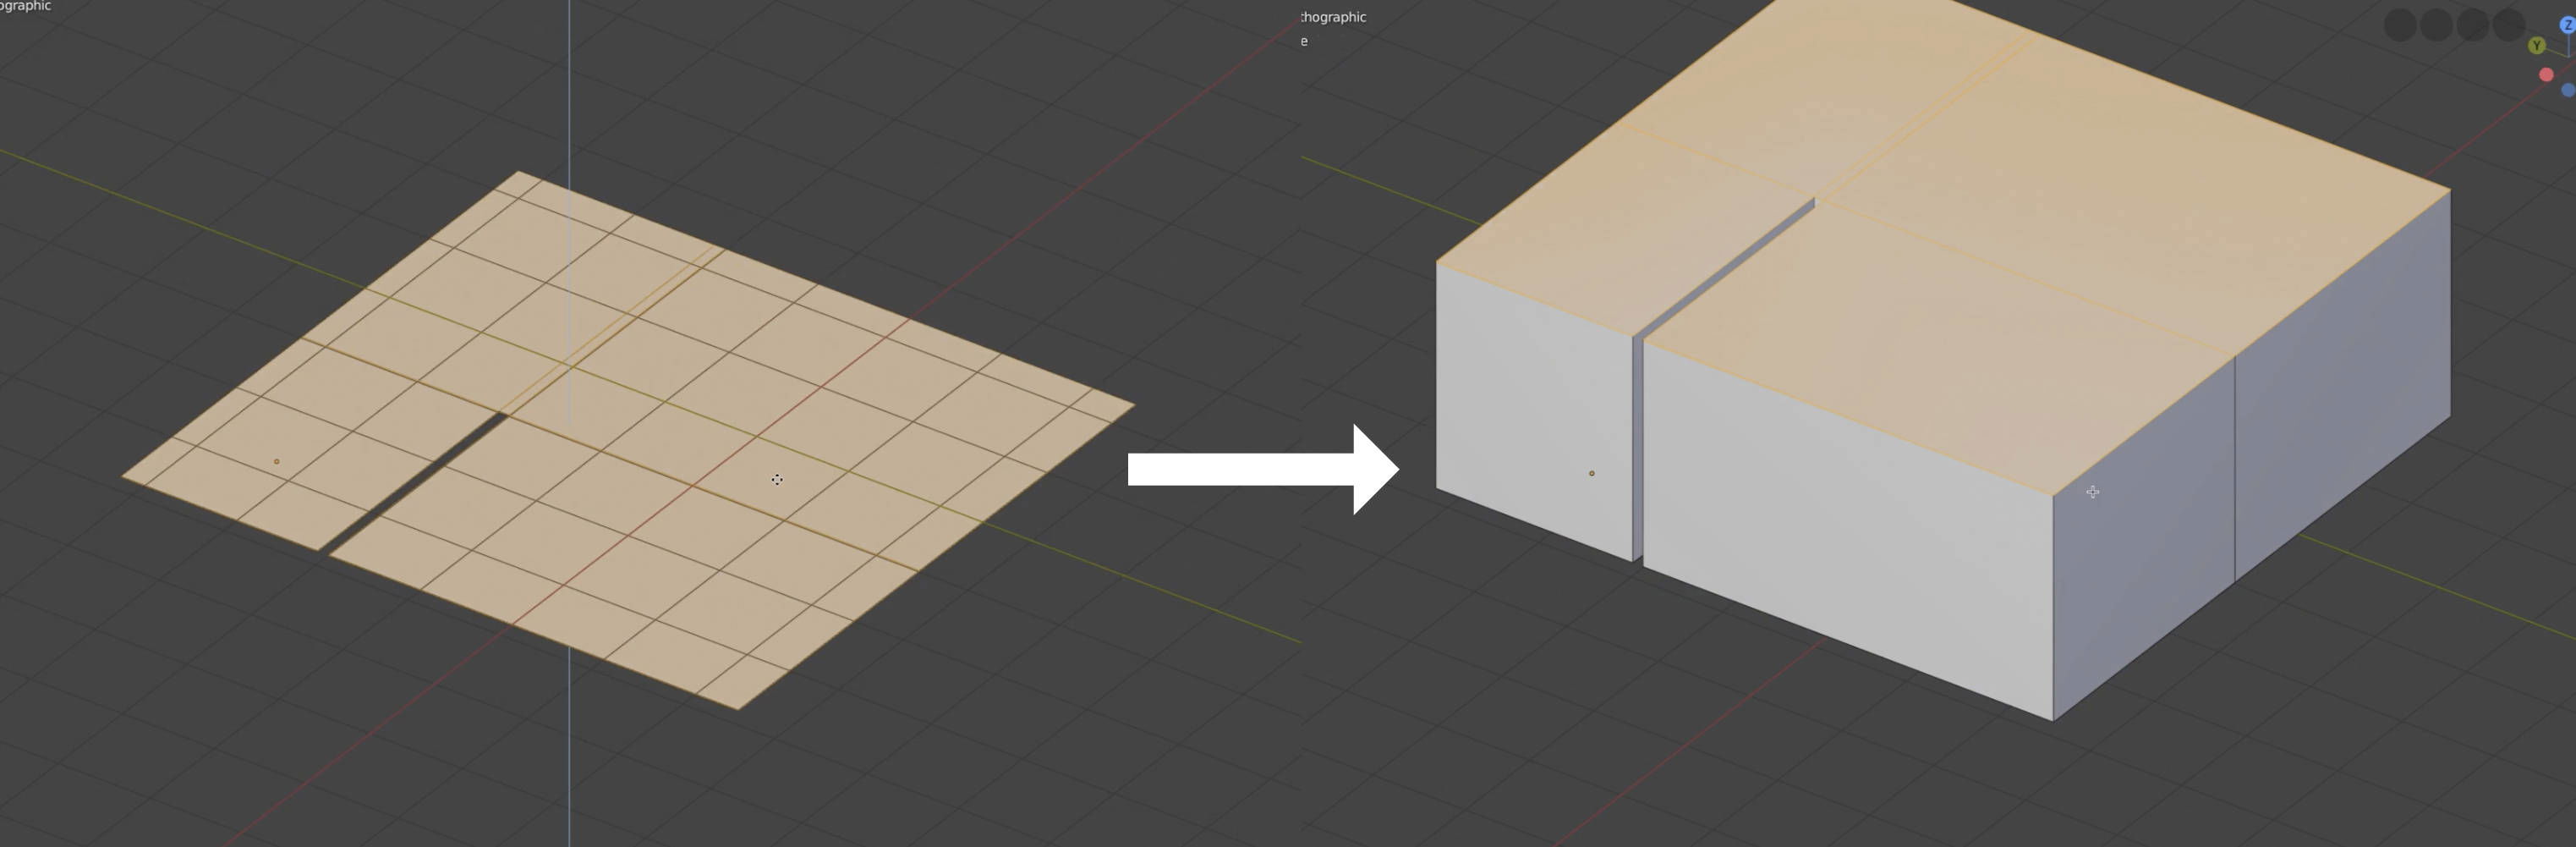
Add a plane, insert some loop cuts and delete some faces to define the floor shape.
Select all faces, extrude them by 2.4 meters by pressing E and then 2.4 to create the walls and the ceiling.
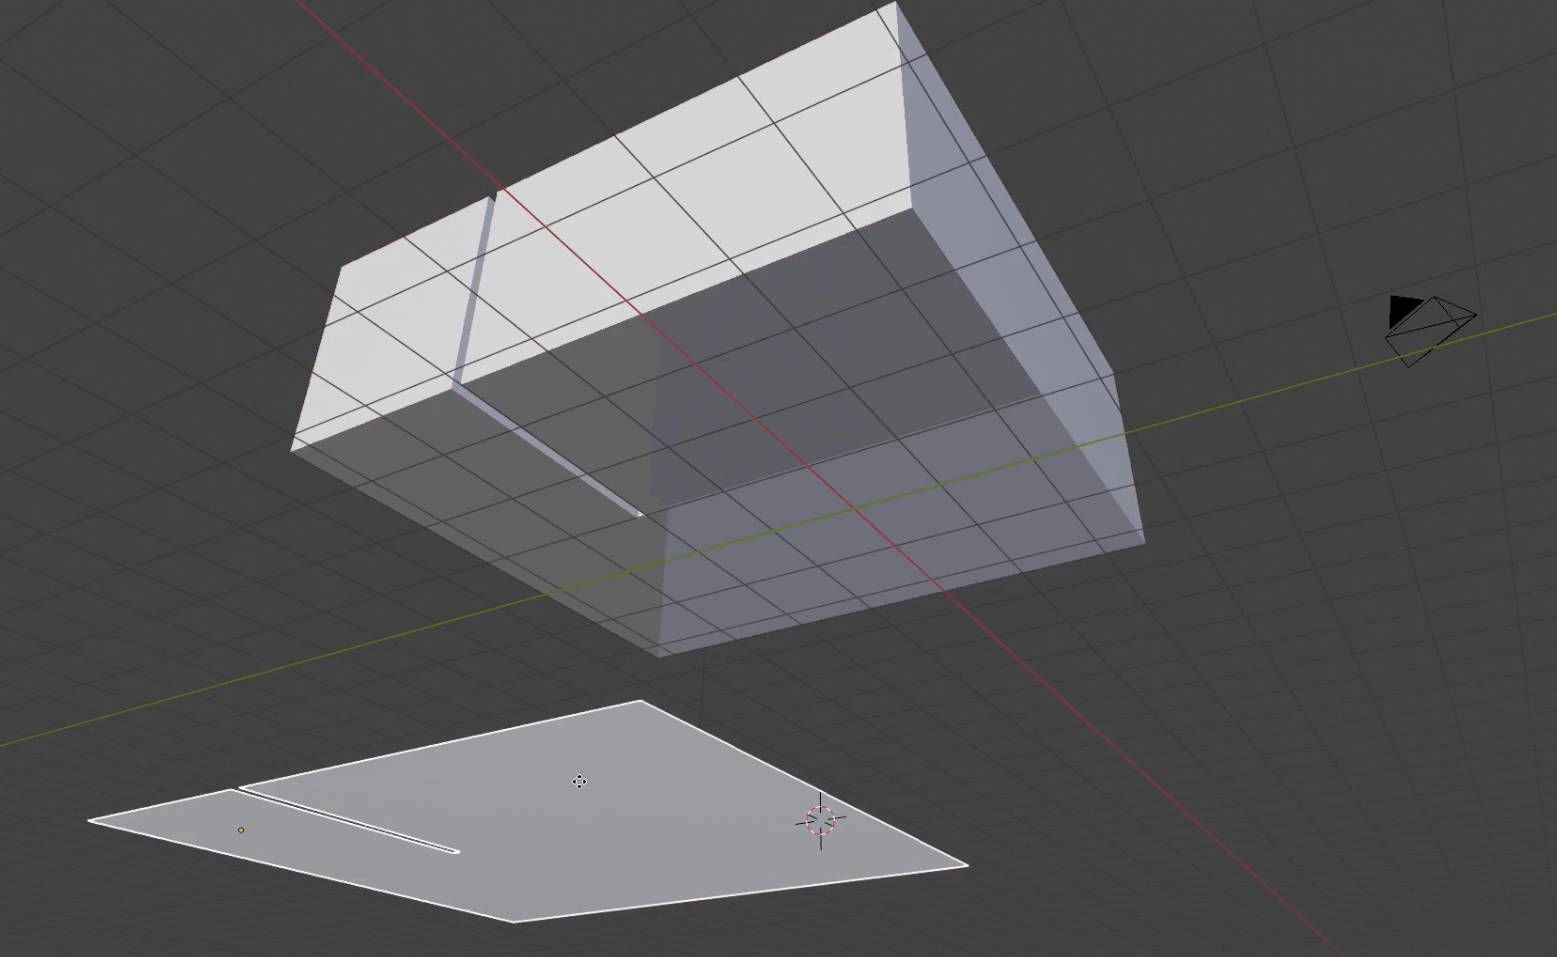
Separate the floor from the walls and the ceiling (Shift + P).
To create the baseboard, select the bottom edges of the walls and duplicate them. Separate them and extrude them on the z-axis to add some height.
Then, add a solidify modifier to add some thickness.
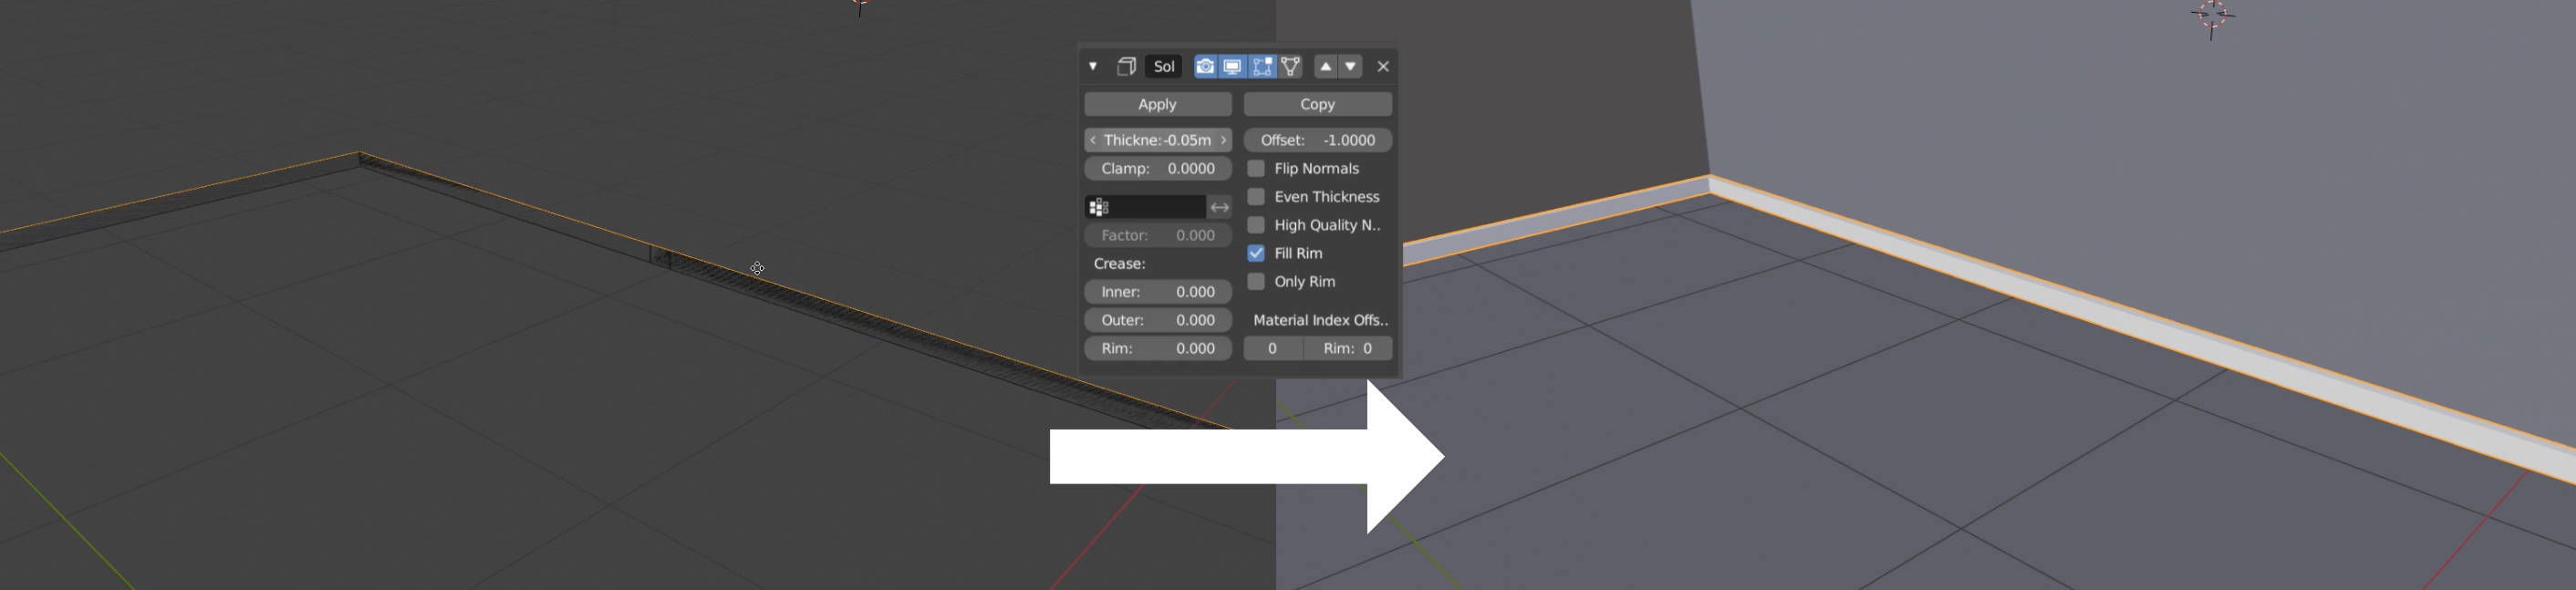
Add a bevel modifier to bevel the edges.
Windows, door
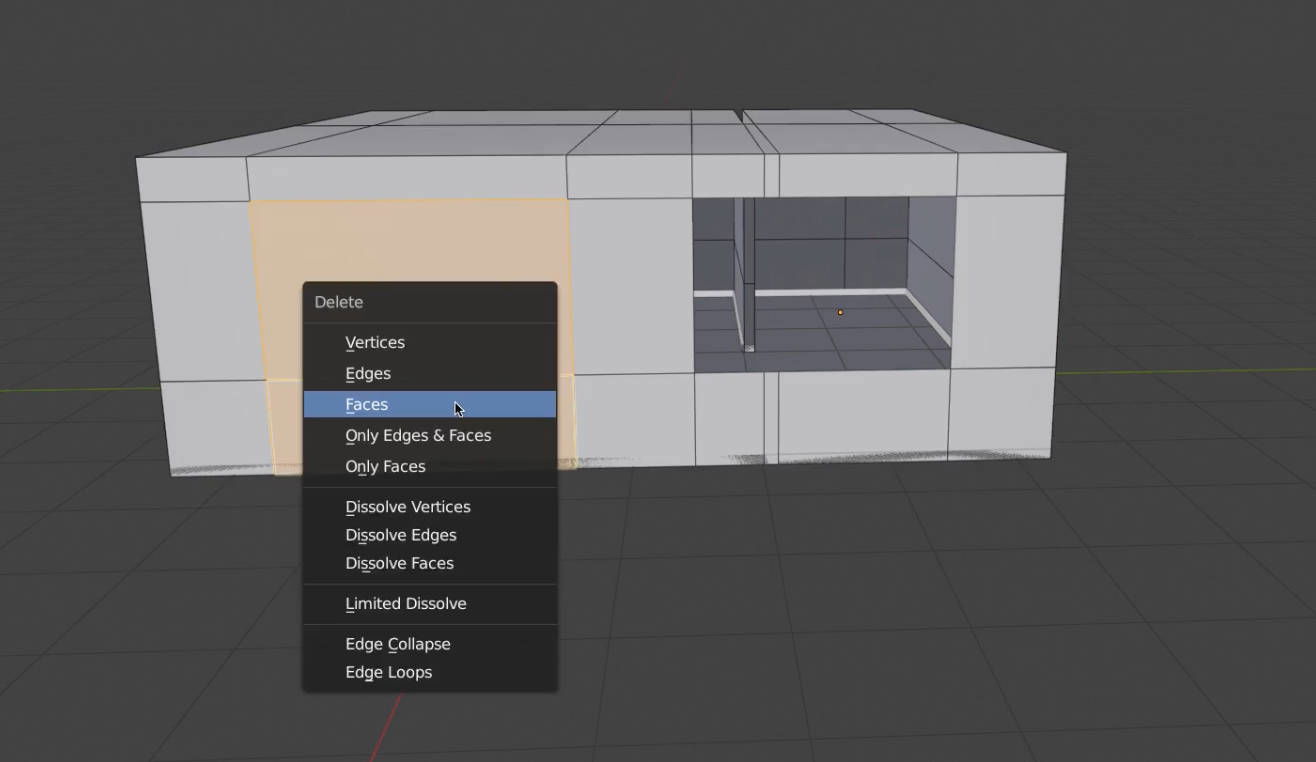
Add loop cuts to the wall to define the edges of the windows. Delete the faces where you want a window to be.
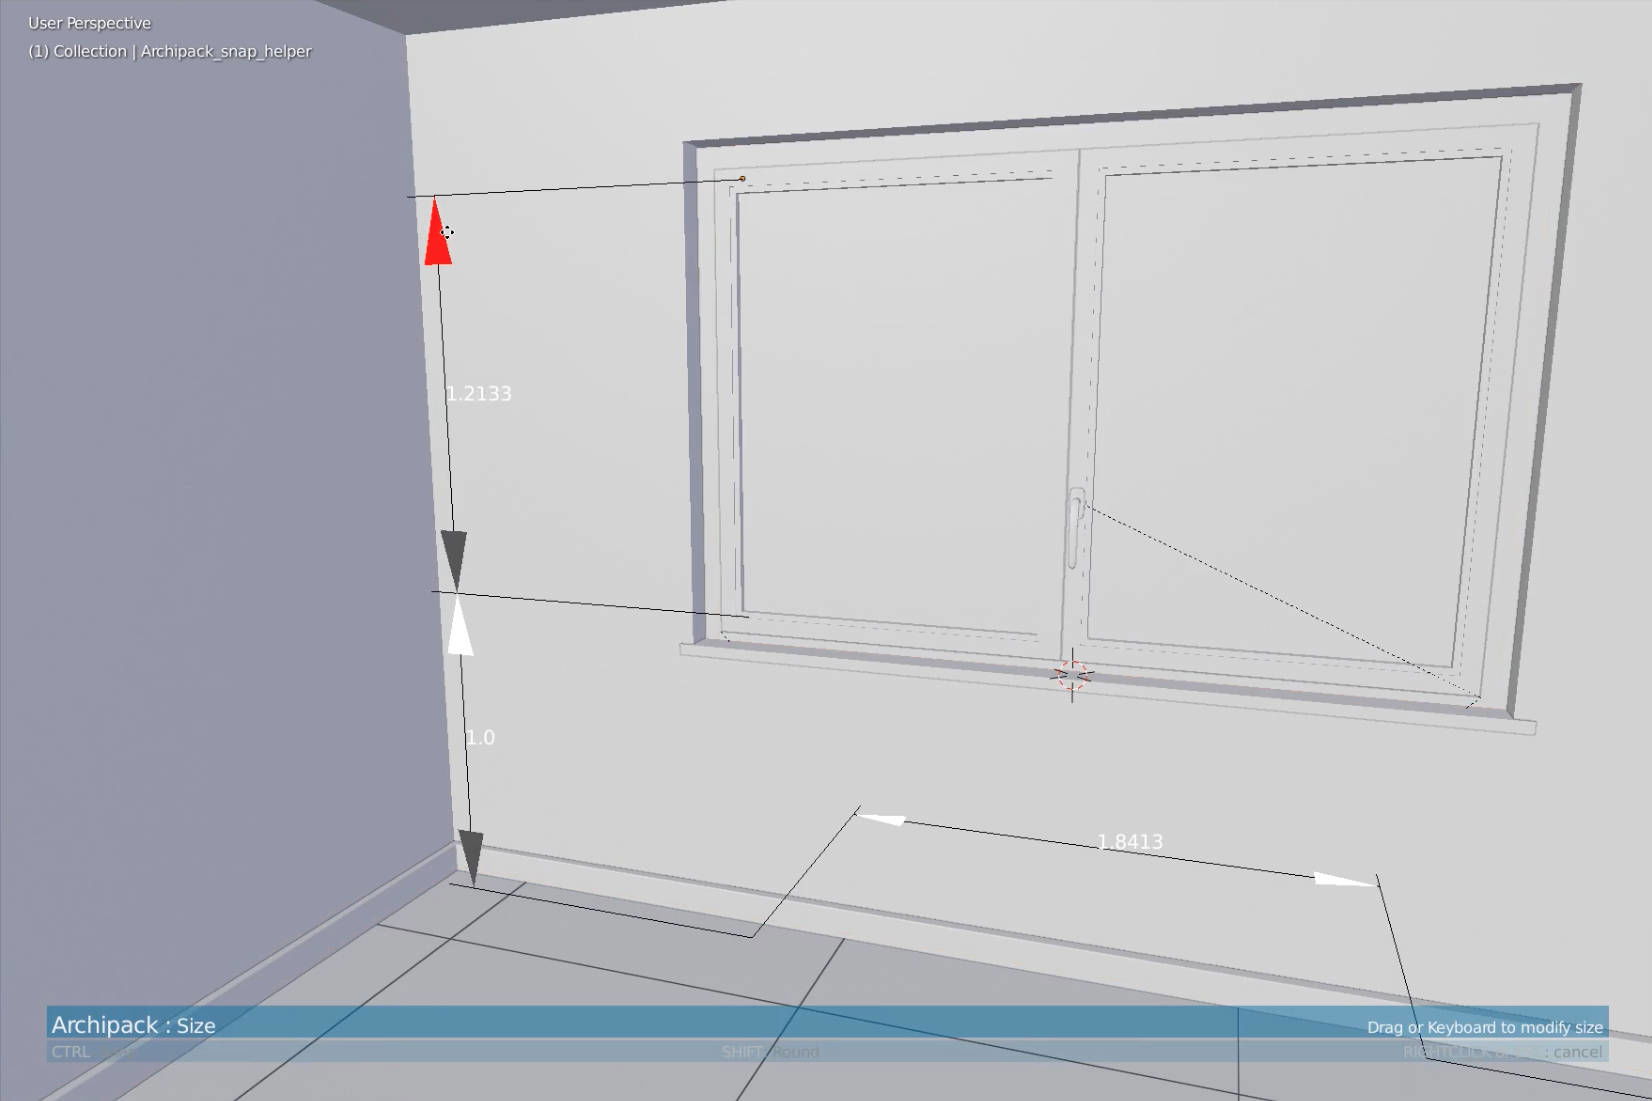
Activate the Archipack add-on (Edit > Preferences > Add-ons). Add a window (Shift + A > Mesh > Archipack > Window and scale it until it fits the holes.
Repeat the same process for the door, but don’t cut a hole for the door, since you can’t open it in the final project anyway.
Furniture
Most models of the furniture are downloaded from Vitra for free.
Download the 3DS file and import it to Blender (as of 17th December 2018 it is not possible to import 3DS files into Blender 2.8, but this might be because it’s still in beta. You can use Blender 2.79 instead.)
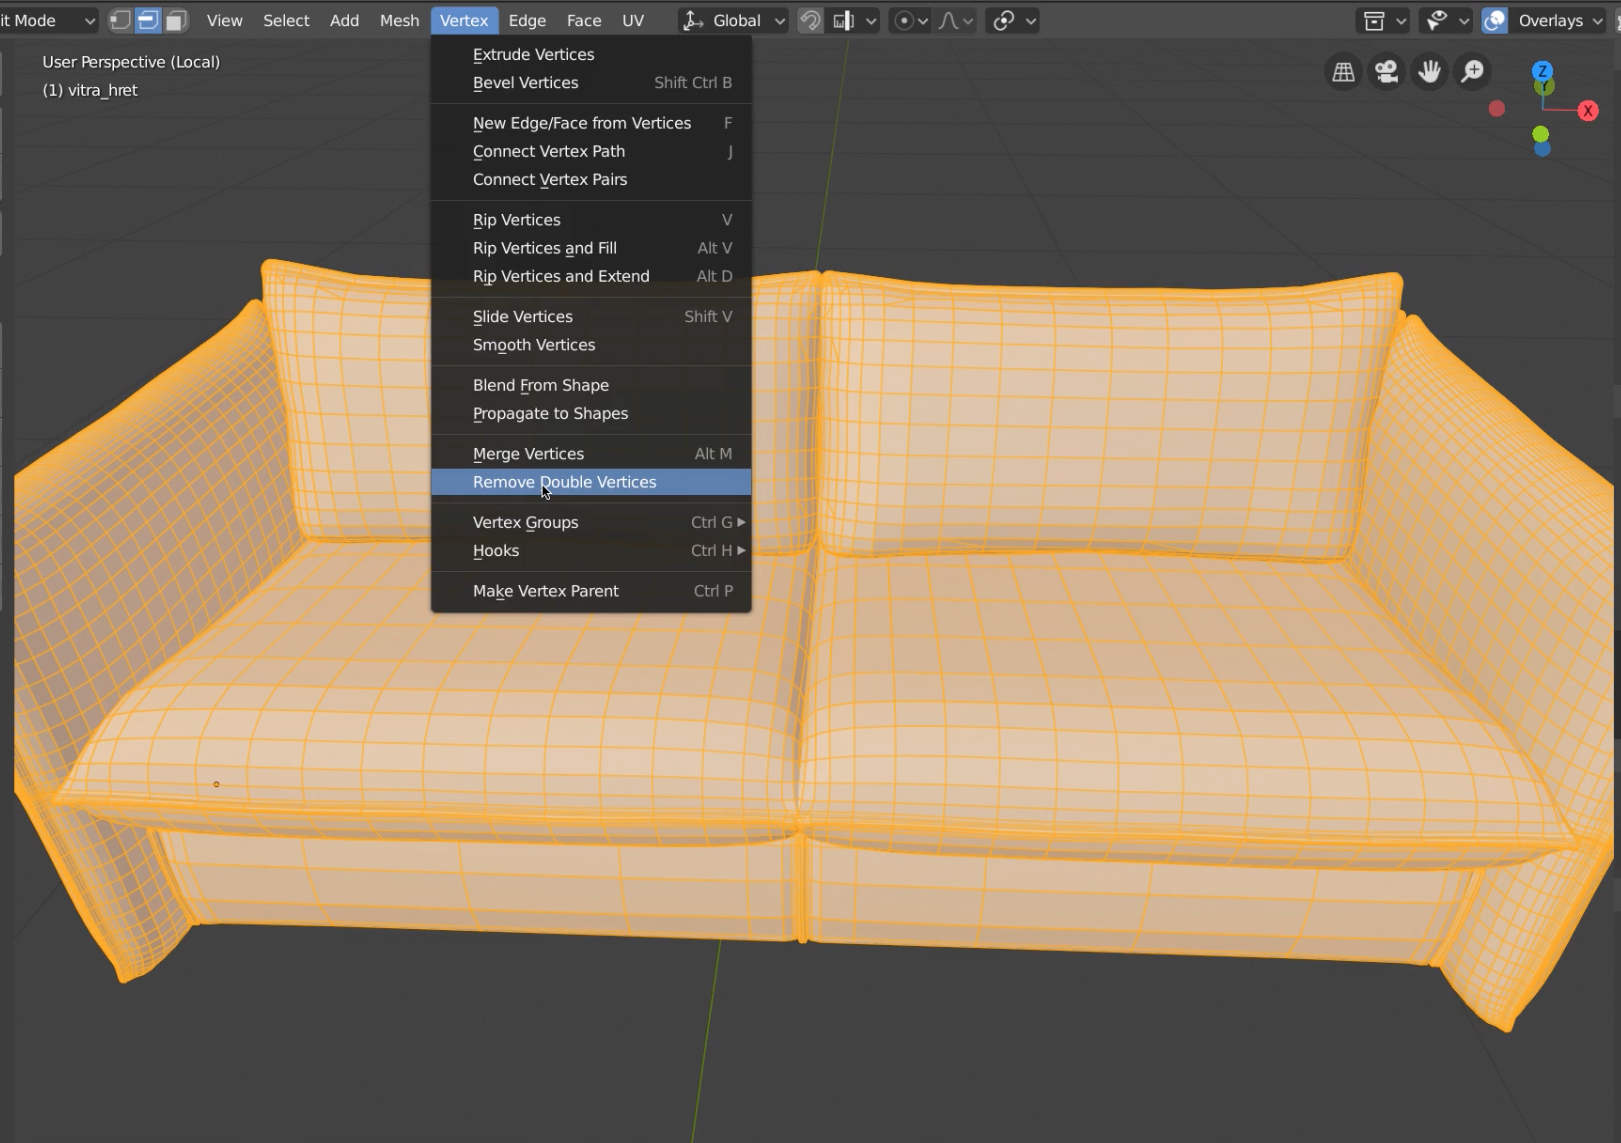
In order to create a smoothly running 3d web application, our 3d models should have as few vertices as possible. You can minimize the vertex count by converting the tris to quads(Alt + J), removing double vertices (Vertex > Remove Doubles) and then selecting several loops and dissolving them (Ctrl + X, must be in Edge Select mode).
On more organic models you can also add a Decimate modifier.

Kitchen
To model the cabinets in the kitchen, you can just use some cubes and planes and scale them on the X, Y and Z axes.
To model the sink, add a bevelled cube where you want the sink to be. Select the countertop, add a Boolean modifier. Set the Boolean modifier to Difference and select the bevelled cube as the object, so it will cut out a hole where the bevelled cube is. You can use the bottom half of the bevelled cube as the actual sink itself.

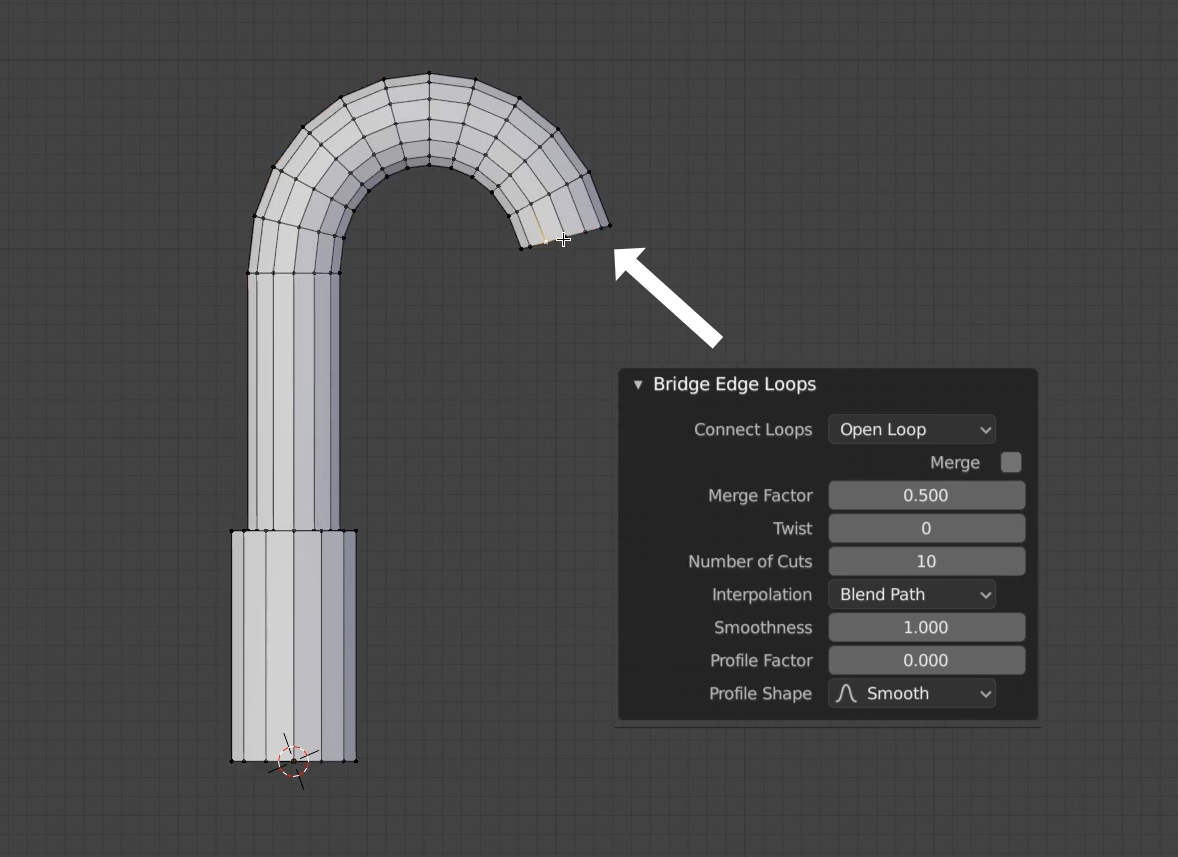
Add a Circle (Shift + A > Mesh > Circle) and use Extrude (E) and the Bridge Edge Loops tool (Edges > Bridge Edge Loops) to model the faucet.
Lighting and Baking
Lighting
To create the lighting, you can use an environment map. (I used one from HDRI Haven.)
UV Unwrapping
Since you can’t really render a realistic looking interior in real-time in a web browser, we have to bake the lighting into texture maps.
Select any mesh object in the scene and then hit Shift + G and choose “Type” to select all mesh objects. Then join them together (Ctrl + J).
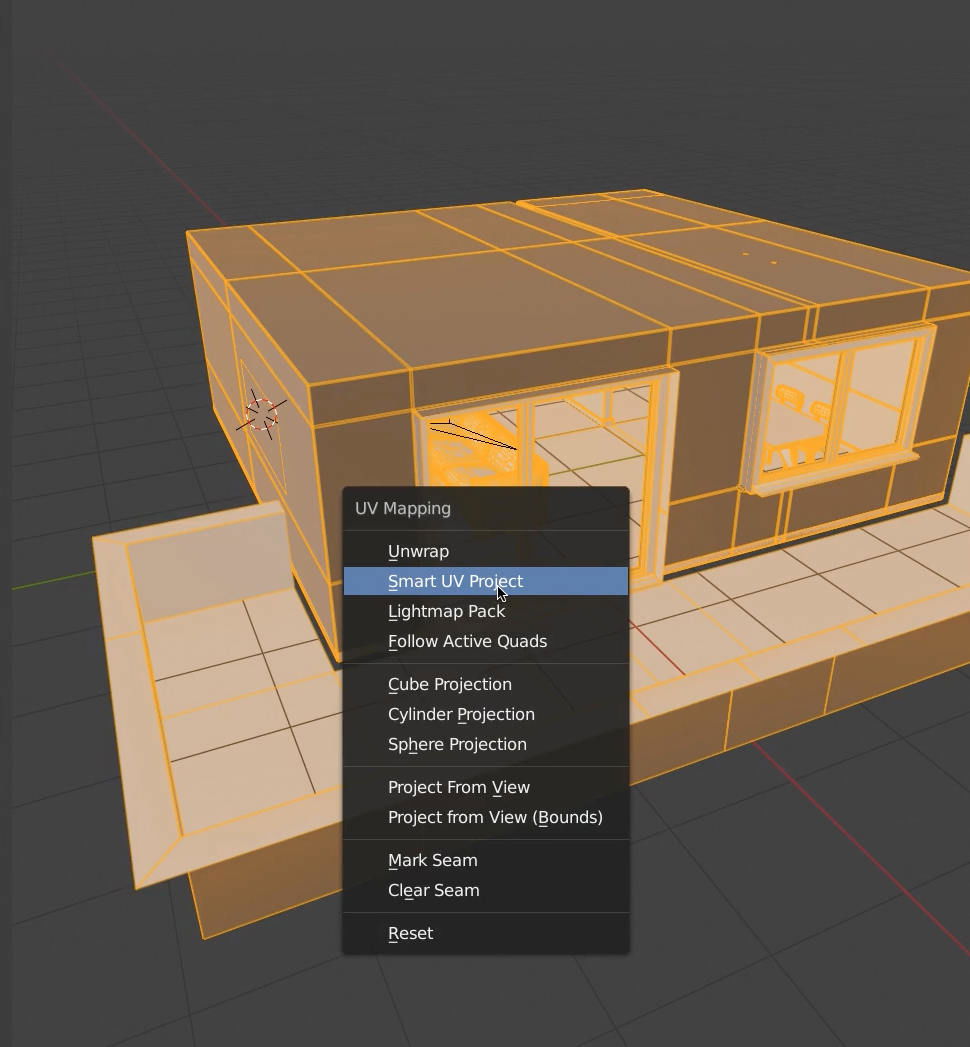
Enter Edit mode, select all faces and unwrap them (U > Smart UV Project).
To not unnecessarily bake light where it’s not even needed, you can scale down the UVs of hidden areas (for instance the bottom of the couch, the sides and the back of the cabinet and so on). I also recommend scaling the UVs of the ceiling down a bit, we don’t need lots of detail there since the nobody will really look at the ceiling very closely.

Baking
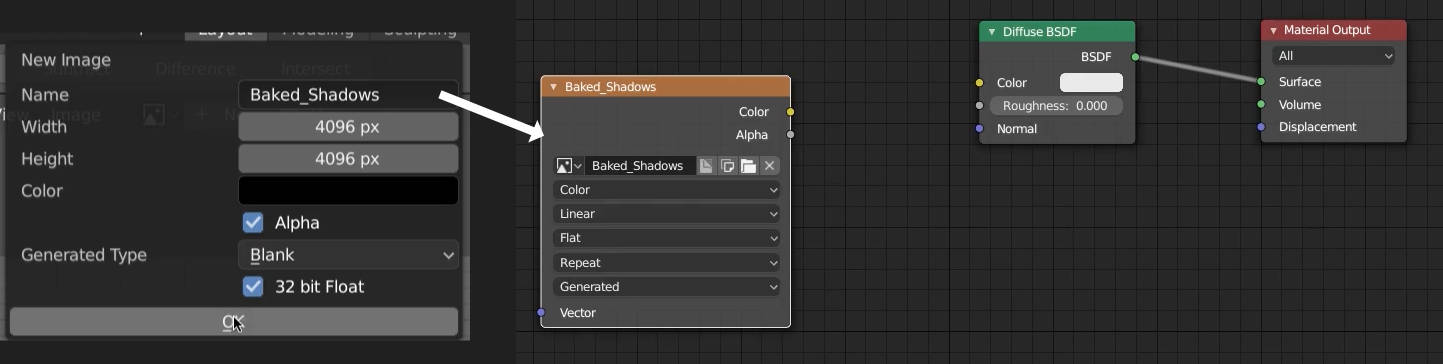
Create a new material that only consists of a Diffuse shader, since we only want to bake diffuse reflections but no specular reflections (= shadows). Add an image node and create a new image. Set the image’s resolution to a power of 2 (for instance: 4069 x 4096 pixels) and check “32 bit float”, so we can bake values greater than 1.
Then, to finally bake it, go to the render tab in the Properties editor, scroll to “Bake”, set the Bake Type to “Combined” and the margin to about 4 pixels. Adjust the samples to your liking and then hit “bake”.
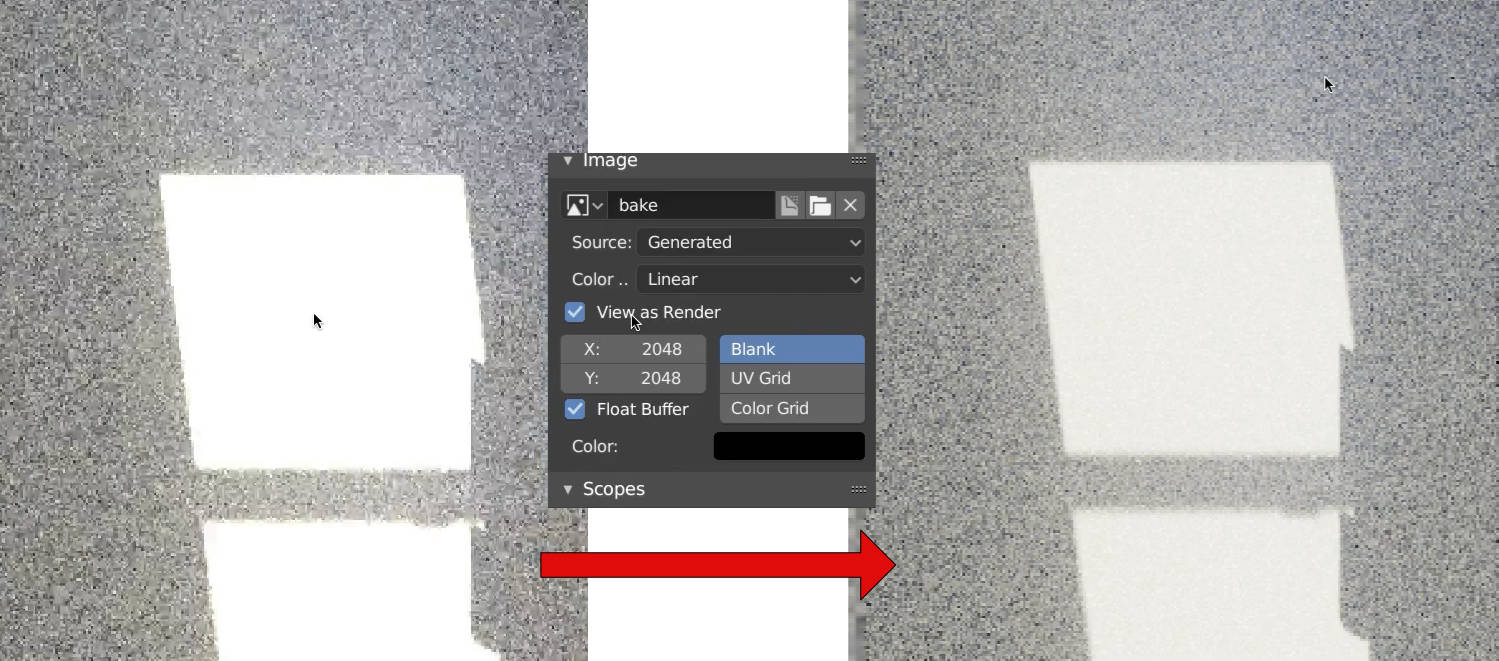
After baking is done, you’ll probably see some overblown highlights. That’s because by default the Filmic View Transform doesn’t affect image textures. To change that, open the properties region in the Image Editor (N) and check “View as render”.
Denoising
Export the texture (Shift + S) and import it to Affinity Photo.
In Affinity photo, add a Denoise filter, then export it as a JPG with the quality set to something between 60 and 80.
Setting up a Verge 3D Project
Download Verge 3D for Blender. You can try it out here for free (affiliate link).
Installation
Unpack the .zip file to a directory of you choice. To install Verge 3D, open the Preferences (Edit > Preferences), go to the File tab and enter the directory where you unpacked the .zip file.
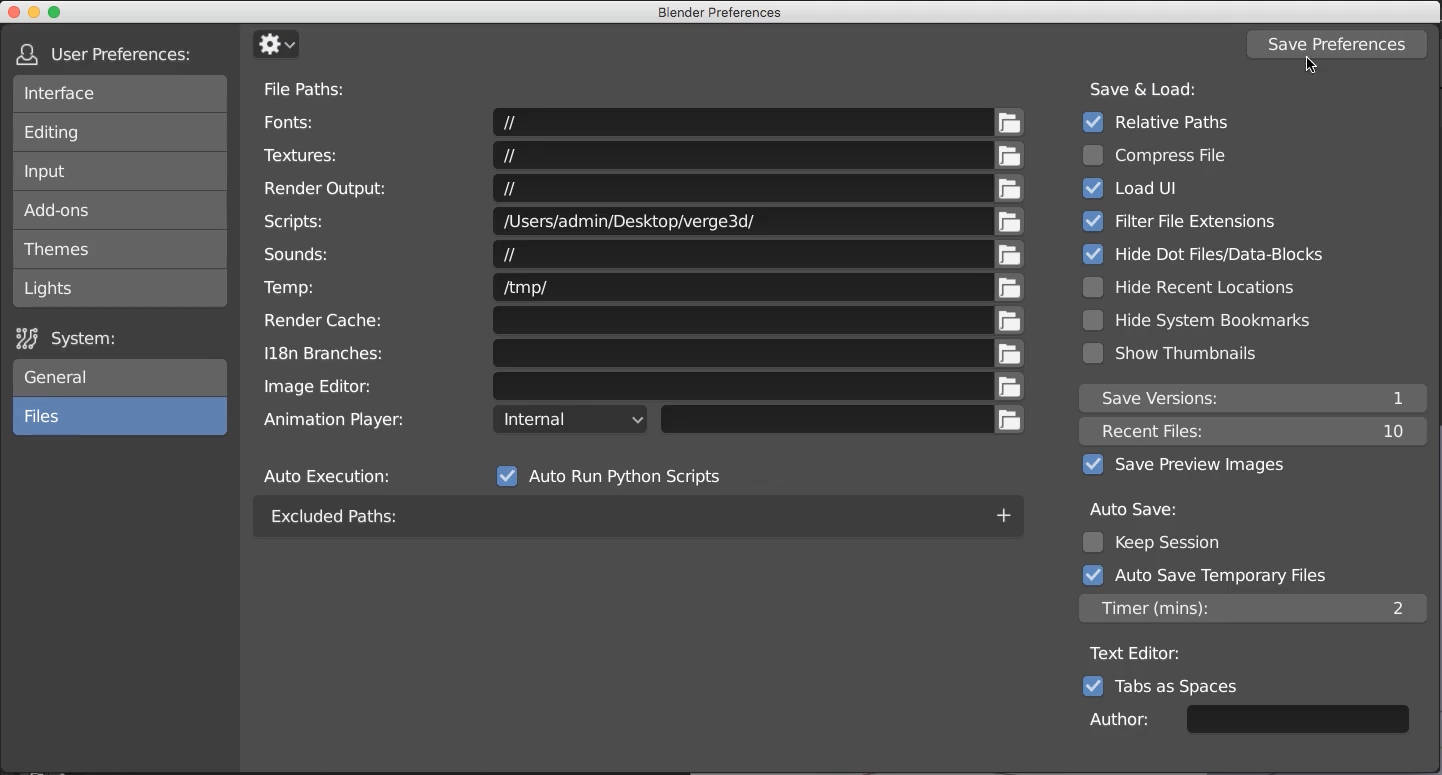
Save the user settings, close and restart Blender, open the Preferences again. Then, search for an add-on called “Verge3D” and activate it.
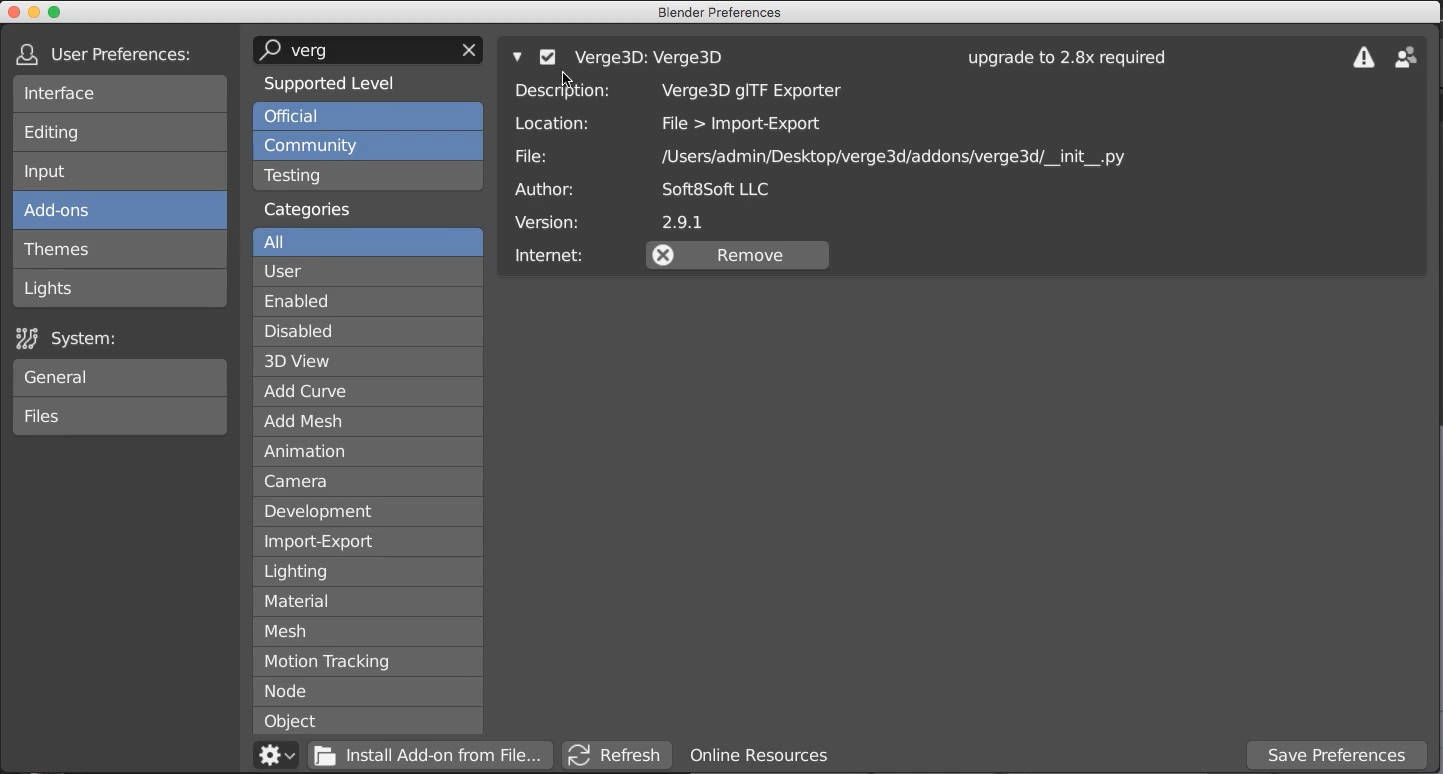
If you’ve done everything correctly, an “App Manager” and a “Sneak Peek” button should be visible at the top of the 3D view.

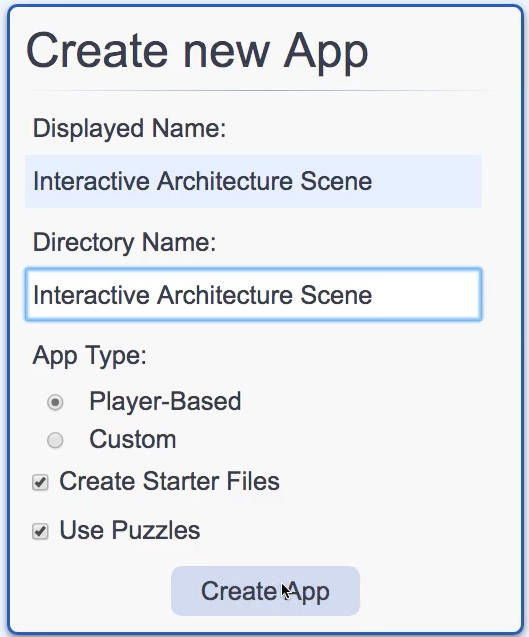
Creating a project
Open the App Manager and create a new project.
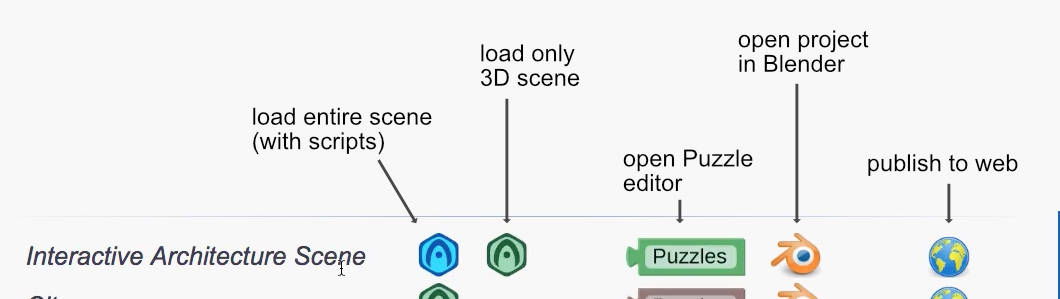
After you create the app, it appears in the list of projects. By clicking the blue hexagonal icon next to it, you can run the full application in the browser. By clicking the green hexagonal icon, you can run the 3d scene only, without the user interface. By clicking on the Puzzles icon, you can enter the puzzle editor. By clicking the Blender icon, you can open the scene in Blender, and by clicking the world icon, you can publish your app on the web. Open the scene in Blender.
Append all the objects from the old scene (File > Append).
Creating the Materials
Before creating the materials, separate all objects that should have a unique material from each other (in Edit mode: P > Selection).
Basic setup
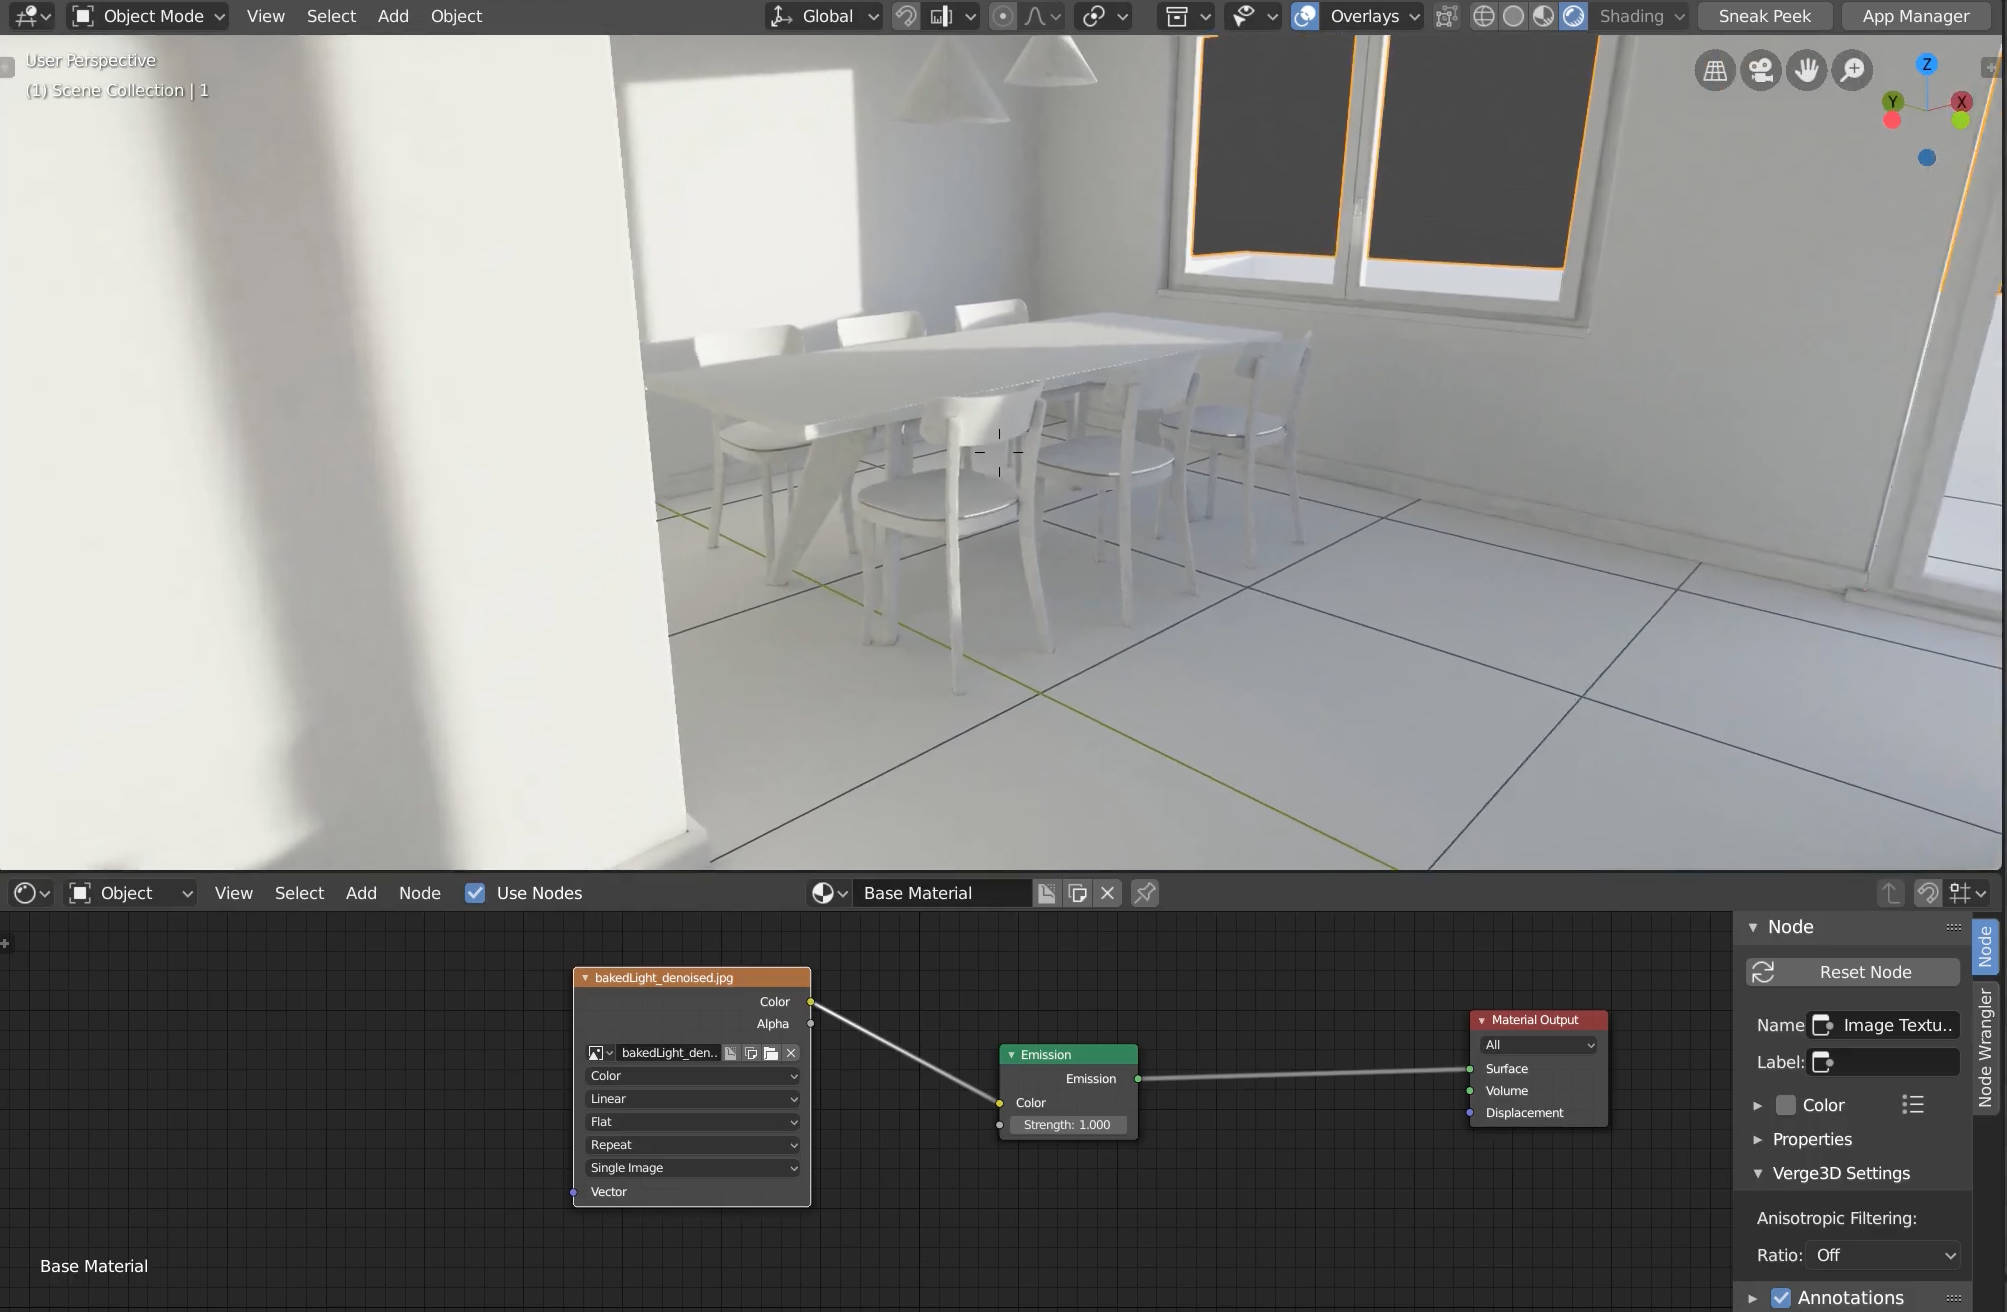
All materials in the scene are built pretty much the same way: Import the baked image texture (Shift + A > Texture > Image Texture) and connect it to an Emission node.
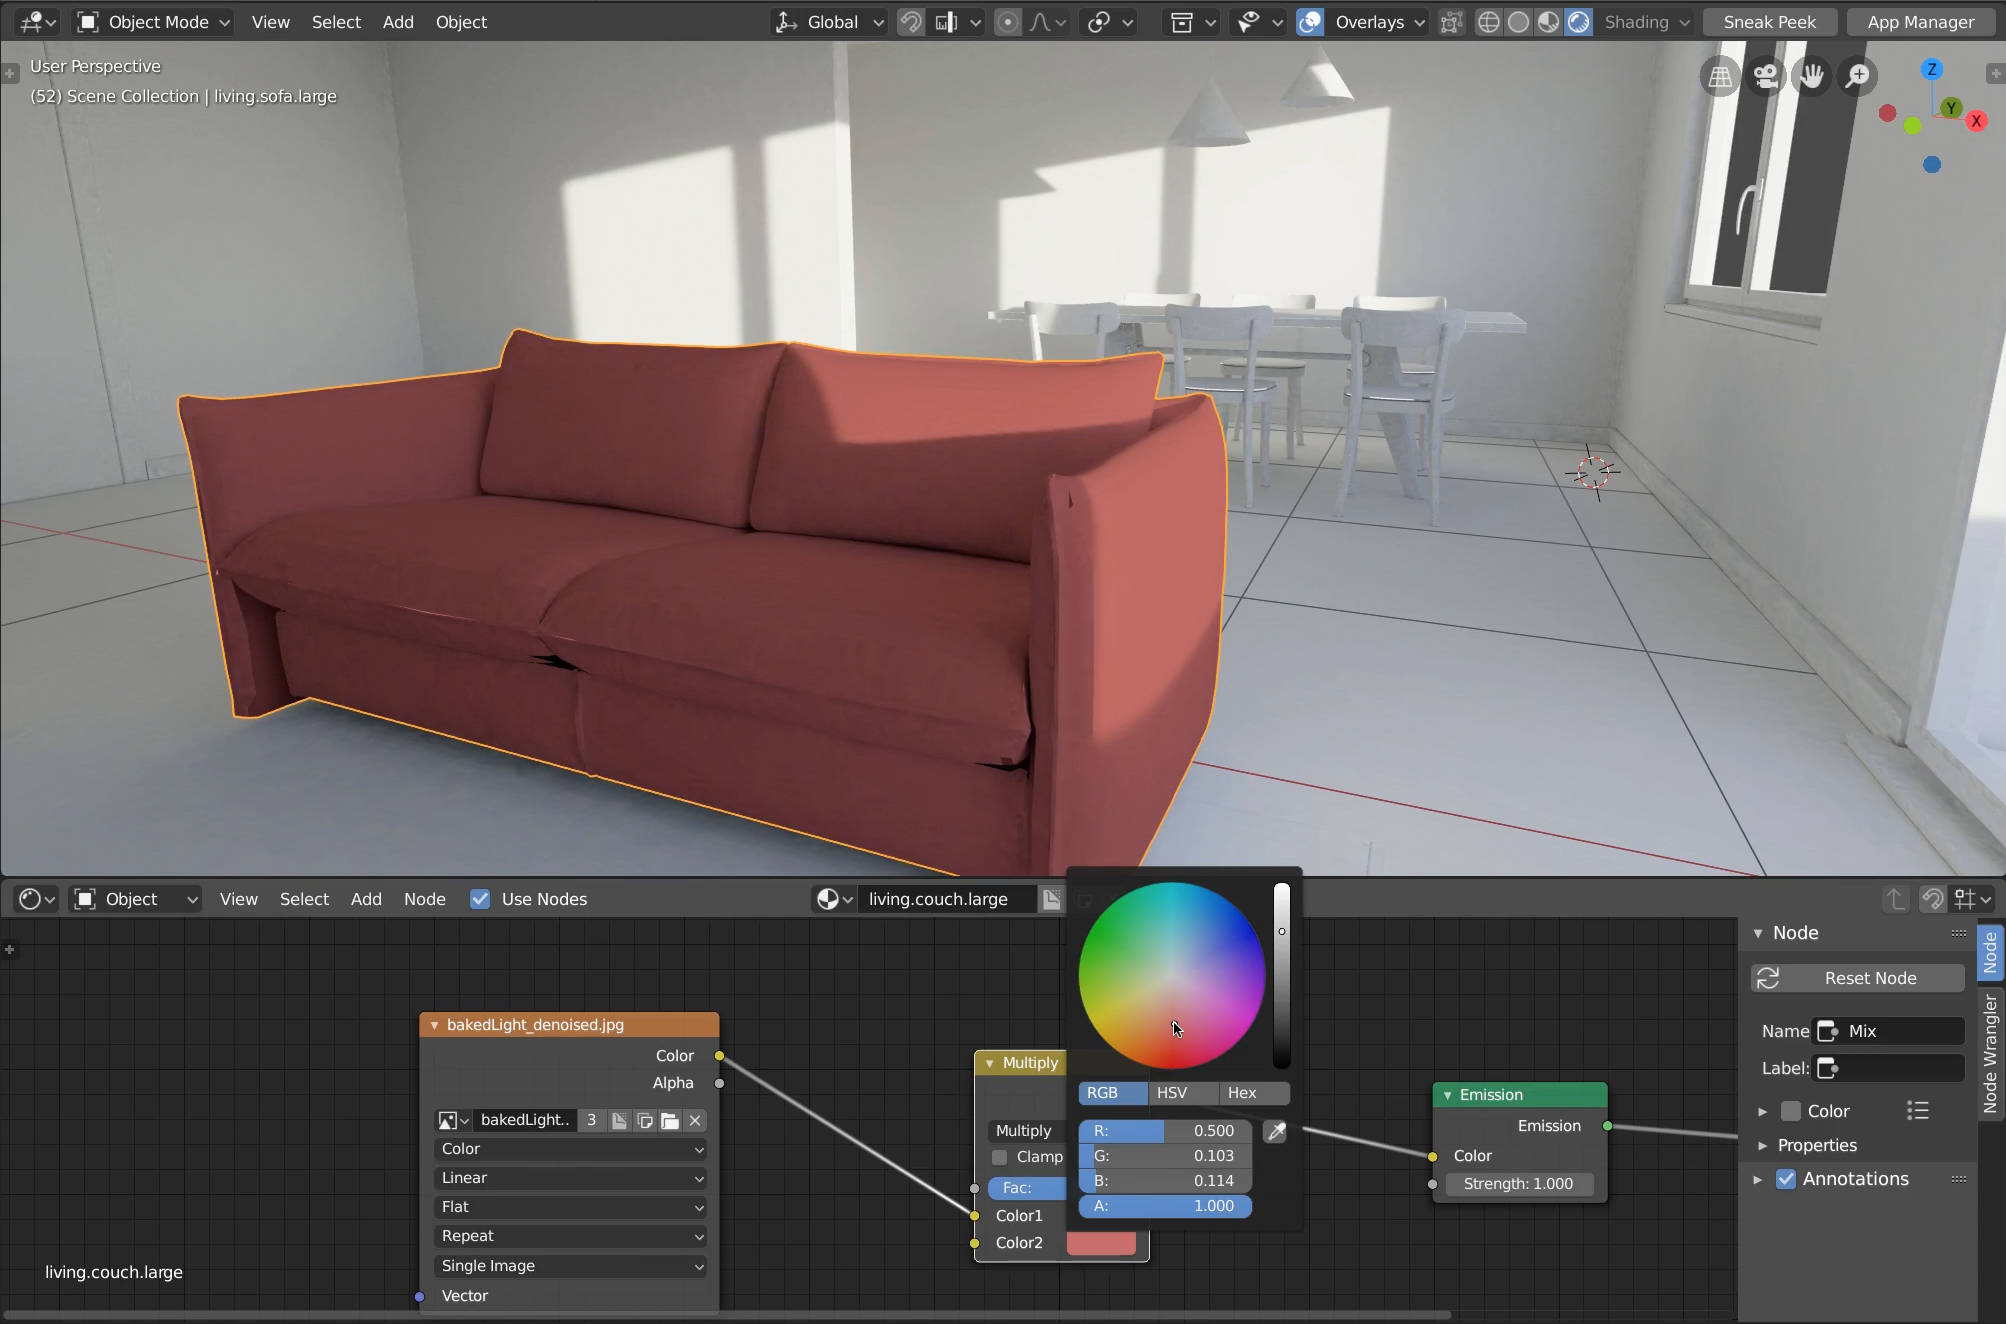
Add a MixRGB node set to multiply after the baked image texture. Colorize the material with the bottom color input.
Adding textures
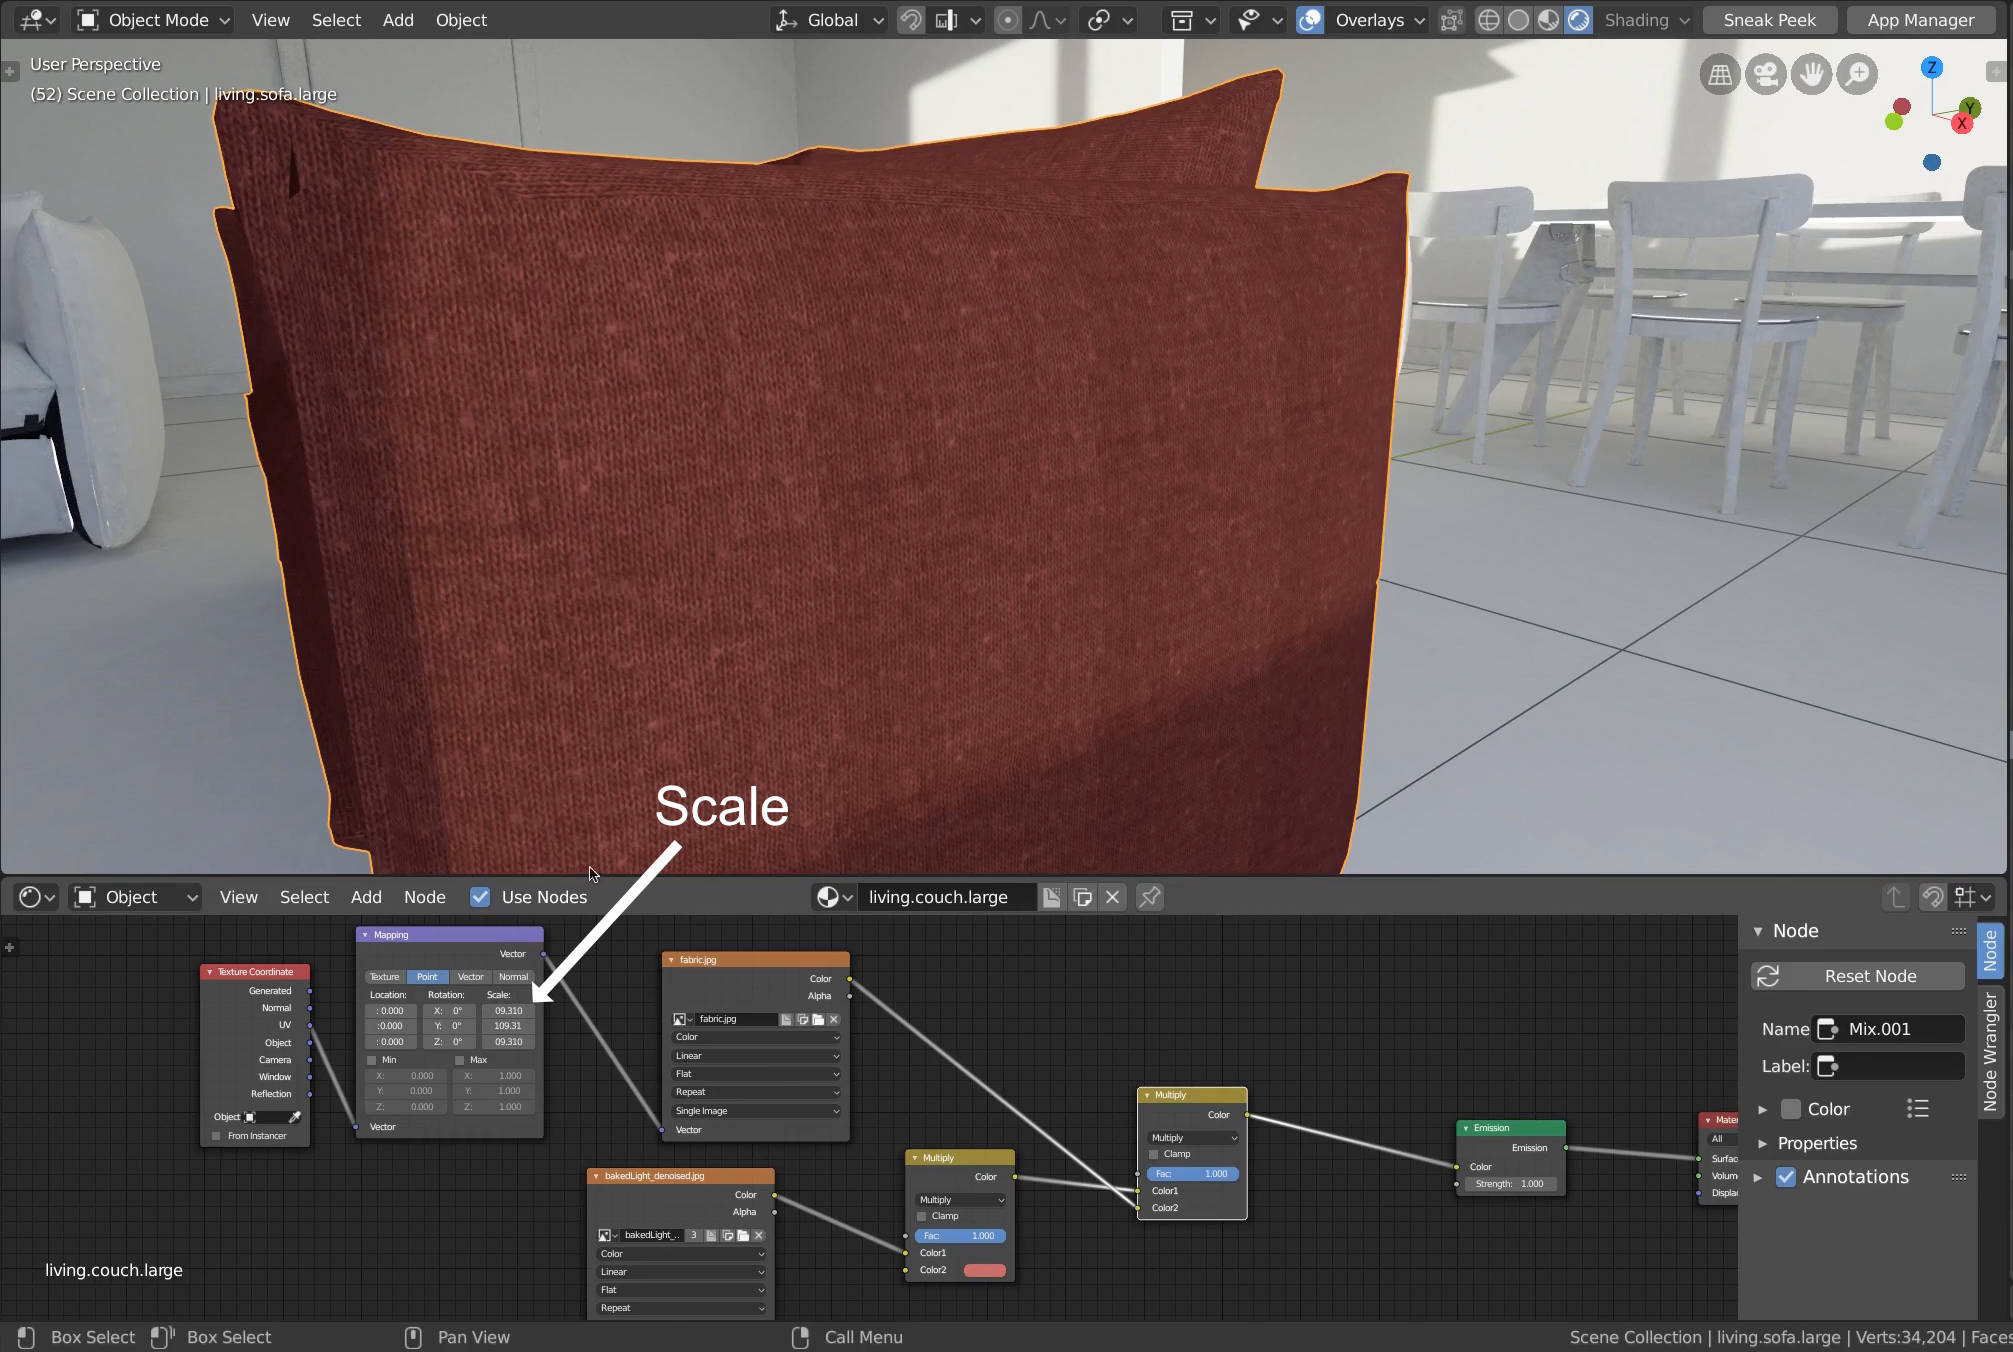
If necessary: Add a texture and multiply it using a MixRGB node again. For the couch I used Blue Cotton 02, for the floor Light Wooden Parquet Flooring 01 and for the table Wood #05 (by CC0 Textures).
To change the scale, add a Mapping Node and a Texture Coordinate node (select image node and press Ctrl + T) and change the values in the scale section.
Adding glossiness
If necessary: Add some gloss by mixing in a Glossy node. (Don’t go over the top here, this needs relatively much processing power.)
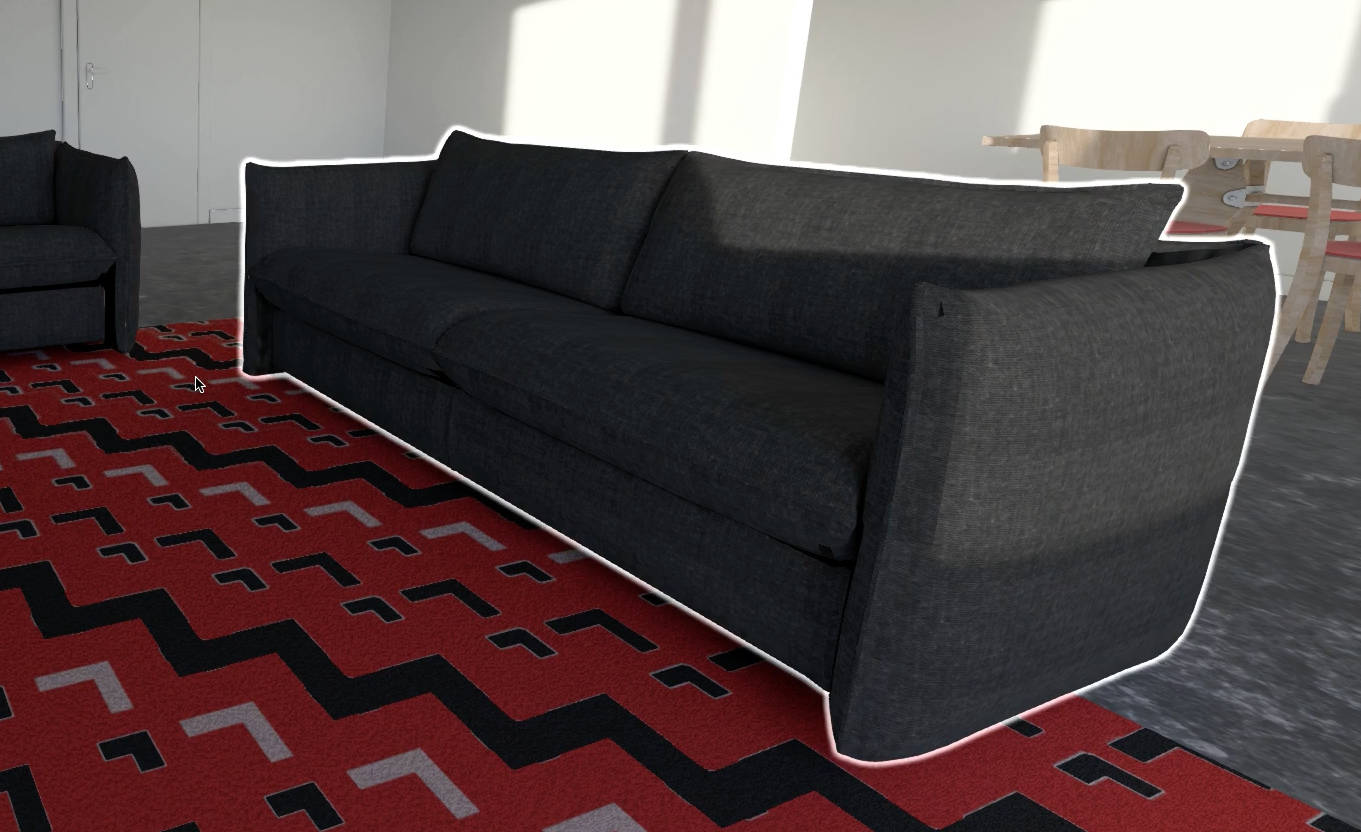
Then repeat that process for every object and create a few variations.
Making it interactive
Introduction
Export the scene as Verge 3D glTF (File > Export > Verge 3D glTF).
Open the App Manager and click the puzzles icon to open the Puzzle editor.
In the Puzzle editor there are two tabs: the main tab and the init tab. In the Main tab, you create scripts that affect the 3D objects in the scene, like changing their materials, moving the camera from A to B and so on. In the Init tab, you can create scripts that don’t affect the objects in the 3D scene, like changing the loading icon.
We’re only gonna use the main tab in this tutorial.
Outline Effect
When hovering over a object, we want it to have this outline:
In order to do that, we need to enable the outline effect in the .blend file by going to the render tab in the Properties editor and scrolling down to the Verge 3D settings. Export the scene again and reload the Puzzle editor.
Using a when hovered block (Events category) and a selector block (Selectors category) we can enable and disable the outline of an object when hovering over it.
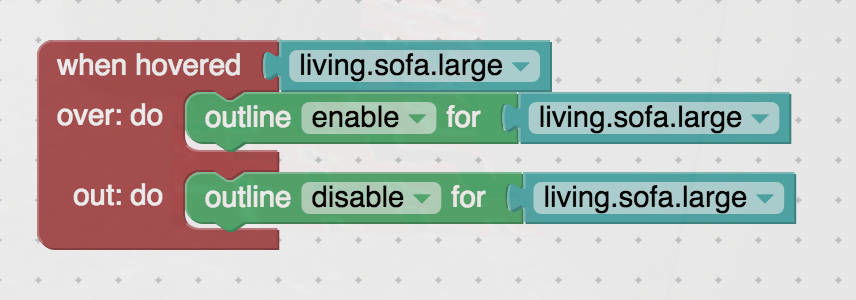
Press “Save” and “Play” to test it.
Camera Movement

User Interface & Making it interactive II
The user interface is created with HTML, CSS and JavaScript (JS).
If you open the folder, where the .blend file of your porject is saved, you’ll notice a few other files: A .html file which actually is opened when we press this blue button in the App Manager, a JavaScript file where we can add more functionality, and a CSS file where we can style the HTML elements.
HTML elements, CSS styling
The background of the white tab is a
selector {
    position: absolute;
    top: 0px;
    height: 100%;
    width: 25%;
    background-color: white;
    z-index: 1;
    padding: 8px;
    box-shadow: 2px 0 20px #00000069;
}
The elements where you can change the material are just a div with the display set to grid, the name as the first element, and two SVGs as the second and third elements.
Hiding and showing controls
Now to make these buttons work, we need to use some JavaScript. Because we need the buttons of the interface to “communicate” with the objects in the 3D scene, it is not possible to do this with the Puzzles editor only.
In the .js file on line 169 you can add your own code.
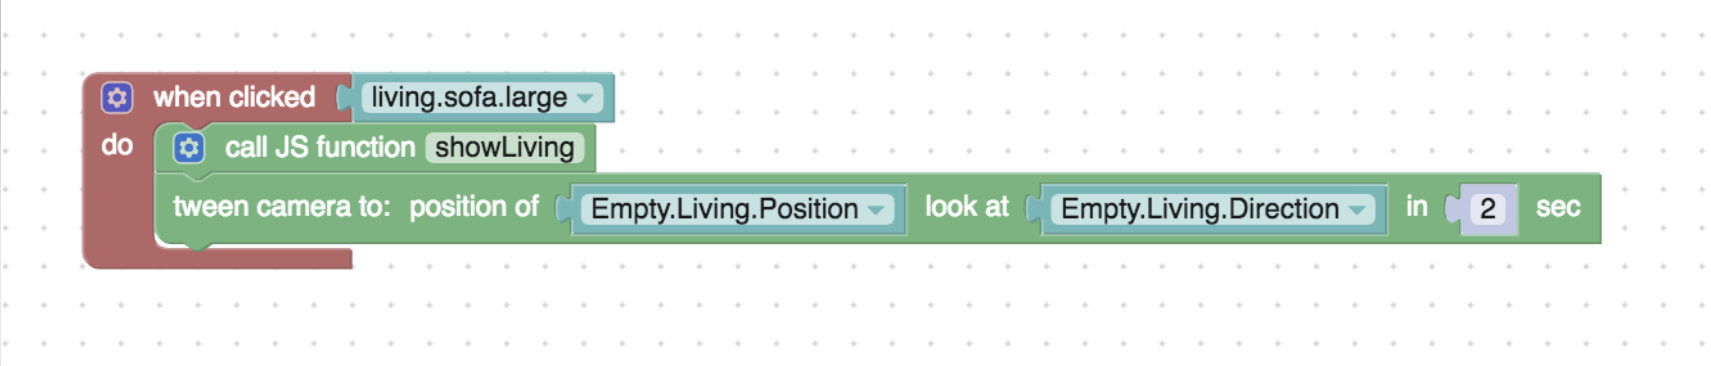
When the couch is clicked, we want the camera to fly to the living area, hide the categories and show only the controls for the living room and the “go back” button. So in JavaScript, we’re gonna create a function that sets the display of the categories and the controls of all other areas to “none”, and the display of the living room controls to “block”.
app.ExternalInterface.showLiving = function() {
    document.querySelector('#livingitems').style.display = "block";
    document.querySelector('#diningitems').style.display = "none";
    document.querySelector('#kitchenitems').style.display = "none";
    document.querySelector('#miscitems').style.display = "none";
    for (var i = document.querySelectorAll('.categories').length - 1; i >= 0; i--) {
        document.querySelectorAll('.categories').[i].style.display = "none";
    }
}
Then, in the Puzzles Editor, we’re gonna call this function when the object is clicked and also add a “tween camera” block to move the camera.
Changing materials when an arrow is clicked
First, we need to define which material belongs to which object, which you can do using lists. Create a new variable (name it “CouchMaterials” or so) and set it to a list of materials:
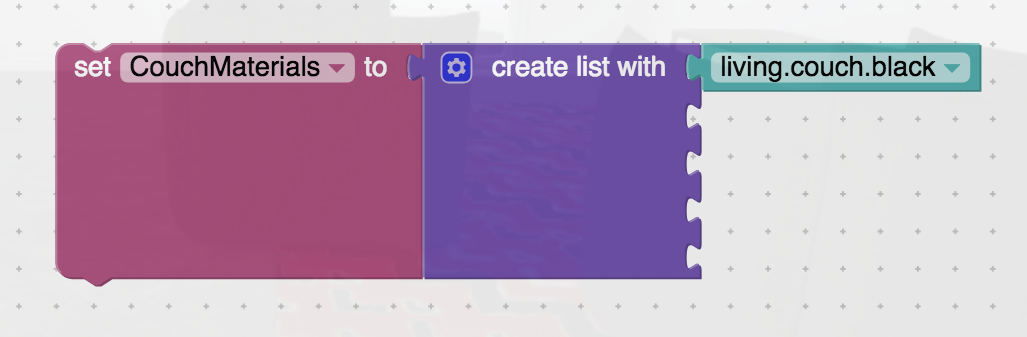
If some materials don’t show up in the drop-down, that’s because only materials that are actually used by an object get exported. In the .blend file, add a plane for each unused material and re-export the scene.
Reload the Puzzle editor. Now you should be able to select the materials.

Now we need to figure out how to program it so that if we click the right arrow, the sofa will change to the next material on the list and if we press the left arrow, it will change to the previous material on the list.
The solution I’ve come up is relatively simple: We first need to create a new variable -let’s call it “CouchMaterialChange” - and set it number which is divisible by the number of materials in the list. For instance: 500.
To make the material change when we click the right arrow, we need to add an event listener to the JavaScript which reacts when the arrow is clicked. When the event listener reacts, it calls a function called CouchNext,
function runCode(app) {
    // add your code here, e.g. console.log('Hello, World!');

    document.querySelector('#sofaplus').addEventListener('click', function() {
        app.ExternalInterface.CouchNext();
    });

    document.querySelector('#sofaminus').addEventListener('click', function() {
        app.ExternalInterface.CouchPrevious();
    });
}
When the CouchNext function is called, a script in the Puzzles editor gets triggered and adds 1 to the CouchMaterialChange variable. Then the next block takes the result of the remainder of CouchMaterialChange divided by the length of CouchMaterials, chooses the material in the list with the number of the result and applies it to the object.

Then, you can do the same for the left button but reduce the CouchMaterialChange variable by 1 each time the function is called instead of adding 1.

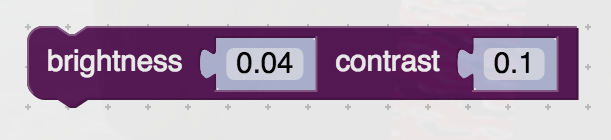
Final touches
You can do some color adjustments using the post-processing blocks. In my case, it looked a bit washed out and dark, so I added some contrast and increased the brightness a tiny bit.